Not long ago, this blog was featuring numerous airbrush projects as Pat Reese Sr. and myself started an airbrush company called Billy and the Old Man design. We gave it a good run, and now only accept one to two projects at a time, and have shut down our storefront and stopped advertising. It went from a full time venture, to a side gig.
While I have never even sat on a motorcycle during my customization days, I do find myself fascinated by customizable motorcycle parts. I personally find motorcycles to be beautiful modern horses. I also still keep in contact with a number of clients that currently ride customized motorcycles that I helped paint.
Cruiser customization, and a number of other businesses are still finding ways to profit during the slow economy. Although, actual airbrushing and custom artwork has become a luxury item people are less willing to pay for (or at least 'pay enough' for). The burden of working on motorcycles did stress me out, but the act of airbrushing is something I truly enjoy.
For those of you motorcyclists that still periodically stop by my blog, and website, please continue coming by. I will be featuring new airbrushed projects and displaying the newest projects we are tackling. Feel free to click the airbrushing tab below to browse around some other airbrushing posts, with pictures and info.
Showing posts with label motorcycles. Show all posts
Showing posts with label motorcycles. Show all posts
Thursday, January 15, 2009


Thursday, March 6, 2008
Do you want to learn how to airbrush?

If I am not painting, airbrushing a motorcycle or organizing art shows you can safely bet that I am giving airbrush classes. When I meet a new artist interested in learning how to airbrush I have to go over a few simple rules to follow when learning how to airbrush. I figure I would list these tips here for anyone wanting to learn how to airbrush:
Know your Gun
There are many uses for learning the skill of airbrushing. Motorcycles, t-shirts, signs, fine art, bodypainting ect. No matter what you plan to airbrush, you need to know your gun. The best thing to do when you buy an airbrush gun is to use it: get some scrap paper and do as many tests as you can. If you have problems with mixing the paint, spitting, chunking, dripping, overspray, you need to search online for why this is happening. These are all things you need to solve before attacking an airbrush project. You also need to dismantle your gun, understand the mechanics of it, and put it back together. This will help you understand where problems may be occuring and how to fix them. Practice until you are confident (this may take a while).
Space to Spray
Overspray will get everywhere, in your carpet, in your keyboard, in your cell phone. Be very careful about covering your electrical equipment that is in the same room as your airbrush. You need ample room to set up your guns, mix your paint, lay down some plastic or newspaper to protect drips and spills and also a place for your compressor. This leads us to our next tip...compressor noise.
Compressor Noise
Finding a small portable compressor (which will create your air flow) is the best bet for any airbrusher. This will cost $100-250 dollars, possibly cheaper if you can find a used compressor (which i would suggest). Be forewarned that they can be noisy, even the ones claiming to be quiet create a loud hum during portions of the time you use it.
Stencils & Freehand
Once you have your gun & compressor, feel comfortable shooting some paint, and have a place to paint you are ready to work on a project. Often times, but not always, you will need to use a mixture of stencils and freehand work. Stencils simply aid in reducing overspray, creating hard edges, and color seperation. For those familiar with Craig Fraser, you will notice his mural are about 80% freehand airbrushing which he tributes to has vast experience behind the gun. Each project you want to create make sure you plan out how much stencil and freehand work you will use and cut those stencils out of card stock, old postcards.
Walkthroughs
No matter how skilled you are in fine arts, or how good you are with spray paint....airbrushing is a different ball game. Make sure to get a few airbrushing magazines from the library or search online for walkthroughs. I've seen some decent walkthroughs on youtube. Make sure you understand the proper order in which to attack things, and follow along. Airbrushing if unforgiving if you do things out of order.
I hope this has been a helpful post. If you have any questions about airbrushing, I would love to feature your questions on my blog and give you some advice.

I work for my own airbrushing company called Billy and the Old Man Design. We now can paint on felt and previously did a skull project on a film cannister. This blog has & will feature all sort of our airbrushing adventures & misadventures.
For other airbrush projects see my airbrushed Poker Table, the dragonfly bike, and also the candy/pearl project with a WW2 theme. If you enjoyed this post you should also check out 5 simple steps to become an airbrush artist.
Tuesday, January 22, 2008
Custom Poker Table (picture)

Custom Poker Table
For those that have been following my airbrushing blogs like the dragonfly bike, the ww2 project or the 5 simple steps to become an airbrush artist, you will find that this project is a little different. We got a call asking if we can airbrush felt. I told the guy, "We never have, but we will try." Which is out typical answer when it comes to doing something we have never done before. Next thing I knew I had a brand new poker table in my shop waiting to be painted.
Airbrushing on Felt
Before agreeing to this project I did some research, and found almost nothing about airbrushing on felt. I should call this blog "airbrushing on felt" simply because it would be the only thing to appear on google's search. Not many people have airbrushed on felt, and now I know why. Nothing sticks to felt, overspray and bleeding are endless problems and you've got to wait 2 hours in between each application of color (even if you are just putting another layer of color on the same color). It is very time consuming and tedious. Not to mention I have to buy Createx waterbased paints specifically for this project.
Diamond Logo
The logo was very specific and luckily for me, very simple. I originally printed a sticker of the logo on our Stika design cutter, but soon learned the sticker did not adhere to the felt. Then I had to recut the logo piece by piece with green automotive tape. After all the trials and tribulations I am actually quite happy with the end result. It only took me three times my estimated time investment.
But now I can say, "Yes, we can paint on felt.....it just takes forever."

I work for my own airbrushing company called Billy and the Old Man Design. We now can paint on felt and previously did a skull project on a film cannister. This blog will feature all sort of our airbrushing adventures & misadventures.
For other airbrush projects see my dragonfly bike, and also the candy/pearl project with a WW2 theme. If you are artist you should also check out 5 simple steps to become an airbrush artist.
Saturday, December 8, 2007
Airbrushed WW2 Fighter Planes

Airbrushing
Often times for my job as an airbrush artist (billy and the old man design), I am asked to do mock up tests of a certain subject or color scheme. This mock car was painted with WW2 fighter planes depicting a night scene. The potential customer was just throwing out this idea of figther places, since he himself was involved in WW2. Given the notes I took during our meeting I went ahead and created this sample to show him.
Candy & Clear
You can find the blog and pictures of this project before its candy and clear coats here. As you can tell, the dark blue candy gives the overall look and feel of night. The added explosion and clear coat brings out the white pearl which was laid down first. As you can tell from the earlier blog, all details and artwork was done prior to the addition of the candy coat. Any color could have gone over the artwork to give the work the feel of early yellow morning, orange sunlight, or any array of emotion.
Larger Project
Given the success of the mock up (once buffed) the customer will decide if he approves of the color, the vehicles, the composition and we can lay out a much more elaborate design on his Harley. Since I went through a lot of planning and steps to achieve this sample, I can follow and alter my strategy for a bigger project.
If you enjoyed this blog check out other airbrushing blogs like: Dragon Fly Motorcycle and 5 steps to become an airbrush artist

Friday, November 30, 2007
Dragon Fly Motorcycle- PART 2

Insect Update
A few days ago I posted a conception sketch for the dragon fly ninja motorcycle. Today I want to make an update post on how the dragonfly bike is coming along.

Also, in case you missed my 5 simple steps to becoming an airbrush artist post, please check that out as well.
Illusion Blush Pearl
After showing off our conception sketch to our customer, we talked colors. This sea foam illusion color, which changes from green to bronze was the insect color of choice. We did a test mock tank, as you can see at the top of this post. We also ran a number of candies and illusion pearls in the wings to give them a transparent yet morphing quality. It is hard to explain with only one photo, but the colors of the wings change in each section from one color to another. The mock tank is only 15", which will mean the wings end result on our bike will be approximately three times as large.
Segments on the Body
Once the base coat was applied, I went ahead and airbrushed the dark segments breaking up the front fender, back fender and tank as you can see below. Keep in mind, all work here is uncleared and therefore not nearly as shiny and impressive as it will be once final cleared & buffed out.

Next step
Over lunch today, we gave our customer the mock tank and he approved our wing desing. Now we are cutting our designs for the ferrings, and will begin to layout the wing design to be shot on Monday. The other parts of the bike are sanded and ready for final clear.
see other airbrush blogs: WWII Air Battle, or see 5 steps to become an airbrush artist & also Dragon Fly bike PART ONE
to see other airbrush work by me see our gallery at: Billy and the Old Man Design

Monday, November 26, 2007
5 Simple Steps to become an Airbrush artist
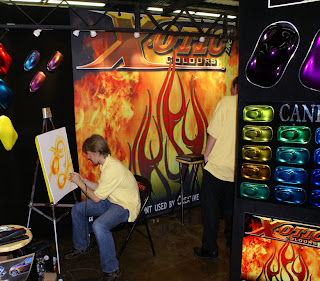
A few years ago I had never touched an airbrush. Now I paint murals on custom motorcycles and other projects for my new airbrushing company Billy and the Old Man Design. In the recent year I have been asked many times for tips on how to become an airbrush artist, here is my 5 step answer:
Step 1: Buy an airbrush & compressor
I prefer artist grade Iwata airbrushes, however there are a number of less expensive guns that are suitable especially for a hobby level committment. If you are planning to upgrade to a professional skill you will want to buy the best gun you can afford, it makes avery big difference. Compressors are less important and should fit the location you will be shooting out of. Keep in mind some compressors can be very loud.
Step 2: Set up a shop/area
Makes sure you have decent ventilation and a large enough area to set your objects to be painted. Overspray can easily get in electronic devices & appliances, so keep them covered or move them from the room.
Step 3: Find a mentor
Depending on your art background a mentor can be as simple as someone to show you the ins and outs of an airbrush gun. You can watch how-to DIY videos until you are blue in the face, but unless you have someone who has some experience standing next to you, there will be countless problems with overspray, bleeding, spitting, adhesion ect. All these problems can be simply answered and corrected with a few key tips and insights.
Step 4: Paint
Depending on your final project, you may want automotive paint(for motorcycles, signs or cars), waterbased paint (for canvas, fine art) or make-up based paint (for bodypainting, special effects). I use Xotic Colours for all my automotive work and prefer its quality above all other paints.
Step 5: Study & Practice
Youtube and other video sharing sites have a number of helpful airbrush teaching videos, as well as online walkthroughs. There are also a good deal of great DVDs or books available as guides. I would highly suggest Craig Frasier's videos, especially his mural videos. Again, YouTube and internet walk-throughs are the cheap and easy way to learn. Then practice practice practice. The more tips and tricks you can learn, and apply to your graphic or artwork the faster you will go from novice to master.
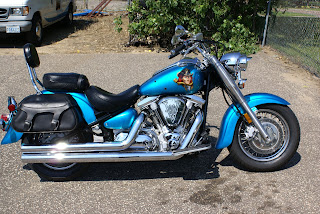
If you enjoyed this post, you might enjoy: Dragon Fly bike
Subscribe to:
Posts (Atom)
